Building a New Computer Part 2: Putting it Together
So youve picked out and purchased the hardware for your new computer, and youve already completed the most difficult step: Waiting for the parts to come in the mail. The next step is putting all of the pieces together, which well cover here.
Note: This is meant to be an overview, to explain the basics
each configuration will be somewhat different, and you should always read the manuals carefully.
Putting the Computer Together
Tools required: Screwdriver, free time, patience, some cable ties or electrical tape, and maybe an anti-static band.
The first thing to do is start carefully removing the packaging from everything and enjoying the geek moment
be very careful when unwrapping the processor, and dont drop it on the floor like I did.

I usually put the processor on the board before putting the board into the case, which makes it a little easier. Open up the latches on the processor socket

making sure to remove the little piece of plastic that protects the pins, of course.
Note that these instructions are for an Intel processor, and might be slightly different for AMD.

Now very carefully insert the processor, making sure to align it correctly with the notches. Close the hatch carefully when you are done. You should wait to attach the fan until the motherboard is securely in place.

Your motherboard should come with a little metal cover for the back, where the ports will go. You should put that in before trying to stick the motherboard into the case.
 Note: Before putting in the motherboard, make sure that the case has the right pegs in place for the motherboard to stand on. Some cases have the pegs built-in, but you might have to add a few. Check your manual.

Now you can carefully put the motherboard with the processor into the case, matching up the holes with the pegs.

Make sure that the motherboard lines up correctly with the holes in the port hole cover
you might end up having to bend some of the metal tabs on the inside if they were bent during shipment. The key is that all the ports should be unobstructed
make absolutely certain before screwing in the motherboard!

Now you can finally screw in the motherboard. Most motherboards have 9 screws, but that could vary. The key thing is that you should be putting the screws into the pegs so that the motherboard sits slightly above the case
and dont fasten these screws too tightly
just snug enough that the board wont be moving.

Next youll need to start plugging in some cables
most motherboards have a 4-pin power cable that needs to be plugged in near the processor. Its important to plug this cable in first before adding the processor fan, otherwise its usually very difficult to reach.
Tip: When putting a computer together, you should think ahead
if you connect one cable or add in a new piece, is it going to block you from putting in the next one?

Now you can add the processor fan, carefully matching up the holes and making sure that you have enough slack in the cable to plug in the power. Notice how difficult it would have been to plug in the 4-pin power cable with the fan in the way!
Tip: It would be wise to use some thermal compound between the CPU and the fan, as it helps keep the temperature down. Its pretty simple, just follow the directions on the back of the package. Its not technically required, however.

Make sure to adjust the four fasteners so that they are positioned correctly according to the manual. If you are using a stock cooler, the bigger part of the groove needs to be pointed inwards.

Once you have the fan in place, you need to push down on each of the four fasteners in a diagonal pattern. For instance, Id push down the upper left one in this picture first, since its crammed in the corner. Then Id push down the one on the lower right next, and then the other two.
(This is usually the most difficult step in the whole build process. Everything else is easy from here)

Next youll want to connect the motherboard wires to the wires coming from the case for the power and reset buttons. This will be completely different based on your motherboard, so you need to check the manual. My motherboard came with a little plastic piece that made it really easy to match them up

This was then easily plugged into the motherboard (in the lower right on this picture). Youll also need to connect your audio, USB, and any other cables coming from the case at this point, including the main motherboard power connectors. (Check your manual)

Now were getting somewhere
slide the DVD drive in place

And make sure to align it with the front panel in place so that it fits correctly before adding the four screws on the side (its pretty simple). Make sure to fasten those tightly
remember that the DVD drive is a moving part and you dont want it rattling.

Now you can add the hard drive to the case. I like to put mine so that the case fan is drawing air across the hard drive. You probably want to connect the SATA cables first before putting it into place. Make sure to securely screw in the four screws, because your hard drive can make a whole lot of rattling noises if you dont.

At this point you should have most of the major pieces in place
but your cables are probably dangling all over. You should be able to use some of the included zip ties or some electrical tape to neatly tie the cables up so they arent dangling.
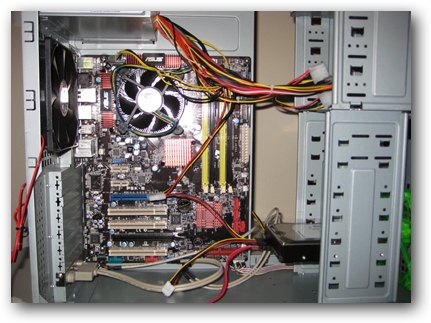
Something more like this
although Ill admit I didnt do the best job of making them look nice. The point is to make sure that the cables arent hanging around and hitting the fans if you move the machine. Making them look pretty is up to you. =)

Im sure you probably thought I forgot about adding the RAM
well I didnt. Ive found that on many cases adding the ram first will block you from being able to insert the hard drive, so I wait to add it until were almost done.
First, consult your manual to figure out which memory slot you need to use. Next, make sure that the fasteners on either side are pushed Out, like you can see below:

Youll notice that the notch in the memory indicates that you can only put it in facing one direction. Line up the notches, and simply push down on the memory stick, and the fasteners should snap into place magically like this:

Now you can add in your video card and any other add-on cards. Make sure that you knock the slot cover off the back first, and screw it into place securely. Remember that youll be connecting things to the back, so take a look to make sure you lined them up to make it easy to connect the cables later.
 Checklist Before Closing Up the Computer
Before you go to the trouble of putting the case back together, you should check through this list to make sure you got everything.
(Note that depending on your config you might need to plug in extra items
remember to read the manual)
- Did you plug in the power cables to the motherboard? Theres usually a 24-pin connector and a 4-pin one.
- Did you add the CPU with the fan
and did you plug in the fan power cable?
- Did you plug in the memory (RAM) securely?
- Did you plug in power cables to each of the drives (hard disk and DVD). What about the SATA cables?
- Did you remember to put four screws in each of the hard drives or DVD drives?
- Did you remember to screw in the motherboard?
- Did you plug in all the wires coming from the case into the motherboard?
- Are any cables dangling that might get caught in a fan?
Now you can add the panels back on the side of the case

And you are done! That was rather fun, wasnt it?
Plug in a monitor and turn your new machine on, and hopefully it will work immediately like mine did
success!
 If It Doesnt Turn On or Start Up
If the computer doesnt turn on or work right away, dont panic
the problem is most likely that something isnt connected correctly. Go back through and verify that every single cable is connected exactly as the manual says it should be.
.